I forget how it started, but I realized one day that disassembling Thinkpads is very easy. IBM even had the guide on their site. (Unfortunately, I can’t find it on the Lenovo site.) I’ll walk you through it here, but a few disclaimers:
- Even though it’s easy, disassembling laptops is dangerous if you don’t know what you’re doing.
- This almost certainly voids your warranty.
- If you’re looking to take out your hard drive or CD/DVD drive, there’s no reason to take your laptop apart!
- I don’t talk about static control / grounding. The voltage it takes you to feel a shock is significantly higher than what’s required to destroy electronics components. If you don’t know what I’m talking about, don’t attempt this.
- Shut down your computer, unplug it, and remove the battery before you even think about proceeding!
- Read this in full before starting. If you don’t understand this, don’t do it!
- I make no warranty that these directions are accurate, and disclaim any liability for what happens when you disassemble your laptop. Proceed at your own risk!
That said, let’s take things apart! If you look down at your computer, the “guts” are all underneath the keyboard and the “wristrest” with the touchpad, etc. To remove them, you need to remove some screws on the bottom.
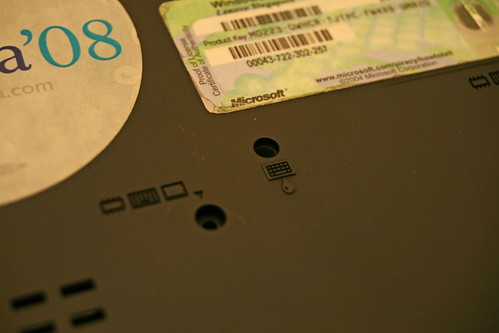
You’ll see that the left screwhole has three little icons next to it. You want to unscrew all of these ones. There’s one that’s dead-center, and it’s an odd one: the screw feels like it’s got a spring attached. It’s a normal screw, but don’t expect it to feel like it as you unscrew it. It’s helpful to “open” the laptop (as if you were using it) and use one hand to push down by the red ‘nub’ (between the G and H keys) as you remove this screw.
You’ll notice that a few screws seem to be missing. They have an icon of a keyboard and then a little teardrop under them. In actuality, these are holes for liquids to drain out of if you spill liquid on your keyboard. I wouldn’t rely on them, but when you get your laptop apart, if you hold it up to a light, you’ll realize that they run all the way through.
After you’ve removed all the screws (there should be 5), turn the laptop back over, as if you were going to use it. (Except that it’s missing a battery and five screws.) The wristrest should lift up. Be gentle, as there’s a ribbon cable just to the right of the touchpad. It connects to the motherboard. So you lift the keypad up slightly, being careful not to strain the delicate ribbon cable, and then remove the connector on the motherboard. It just plugs in, so with a finger, or a flat-tipped screwdriver, you just pluck it out. (Once more: be careful with that ribbon cable!) After removing it, the wristrest should be free. Chuck it to the side for now.
Next, you’ve got the keyboard. It’s the same deal: there’s a ribbon cable slightly right of center that connects to the motherboard. Carefully disconnect this one from the motherboard too. You can lift the keyboard from the three mouse buttons at the bottom, and it should lift up a bit before the ribbon cable catches. Once you disconnect that, the keyboard lifts up. Chuck it to the side, too.
Now you’ve got all the guts in front of you:

Do be careful about static at this point. If you click through on the above picture, I’ve labeled most things.
The first thing I noticed is how filthy the fan is. Ideally, you’ll have a can of compressed air (“Dust Off” or the like), to blow it out with. When you do this, stand back, or you’ll get a face full of dust. Trust me on this. Also, after blowing the fan out, do it from the sides (as if you hadn’t taken the laptop apart), which will get a bit more out. And obviously, be careful you’re not just blowing dust onto other parts of the computer.
When you’re done, follow the directions in reverse order! It’s really pretty simple.
I found it on the Lenovo site if anyone needs further help.
http://www-307.ibm.com/pc/support/site.wss/MIGR-62800.html
Thank you! It help me quite a bit.
Tnx! Very helpful!
Hi,
I would be interested to know if it is possible to pop off the mouse buttons without dissambling the laptop on a thinkpad?
Thanks
Michael
Hi Michael,
It’s been a few years, but I’m pretty sure the answer is “No.” I believe the mouse buttons are a part of the keyboard. I’ve never tried and don’t use my T60 anymore, so I can’t be more informative, I’m afraid.
i accidentally unscred all the screws and flipped my laptop now i dont know which screw goes where please help
What type of screwdriver do I use?
I took off the touchpad to fix a mouse button. Now it simply WILL NOT go back together. It appears that the screws don’t even clamp the top to the bottom! There are NO screw holes on the top piece for screws to go into? WTF!? I’m about ready to just SUPER GLUE the damn thing back together and forget about it.