One thing about photography, at least for me, is that the whole process is enjoyable. Sometimes the pictures I take end up being total rubbish, but I enjoyed taking them anyway, so I’m not too upset.
Another thing about photograpy is that it’s very much a skill. The equipment you use does matter somewhat, and there’s surely such a thing as “having an eye” for a good composition. But the majority of what goes into making a good photograph, I think, is practice: the skills you’ve learned and the techniques you’ve practiced.
It was a gorgeous day outside this afternoon, so I decided to have lunch outside. And I kept spotting photo opportunities, so I went in and grabbed my camera.
I decided to practice three things while traipsing through my back yard this afternoon:
- Using a polarizer
- Using fill flash
- Manual focusing
A polarizer on a camera is really no different than wearing polarized sunglasses. It does a couple neat things: one of the more obvious ones is cutting glare. A slightly less obvious one is that it boosts contrast. The problem with a polarizer is that almost everyone uses a circular polarizer, which means that it has to be turned to just the right spot to accomplish anything. And most lenses (save the ones with four-digit price tags) focus by rotating the front, which means that as soon as you recompose a shot, the polarizer is going to rotate. So what I wanted to work on a bit was the ability to quickly determine the best settings for the polarizer, along with practicing keeping a couple fingers on the edge of the polarizer while focusing, to prevent it from spinning, so I don’t have to readjust it each time.
This isn’t a good shot any way you spin it (no pun intended), but here are some comparison shots of a rosebush in the back yard:
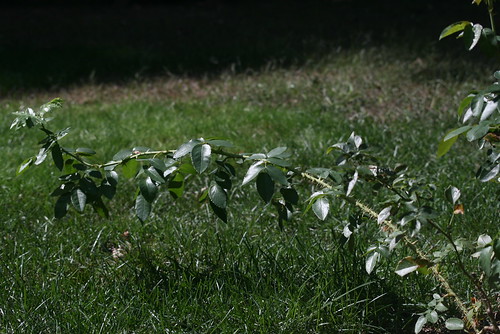

The lighting was about the same in both cases (full sun shining down), but in one case, I had the polarizer adjusted correctly, and in the other it was wasn’t. (Which accomplished about the same thing as not using one.)
The shiny rose leaves reflect sunlight back into the lens, causing the leaves to have really white reflection/glare. And the bright sunlight being reflected back also causes the darker portions to be blown out. (Plus, both shots are underexposed a bit, but that’s something I would have cleaned up in Photoshop, except that these are unprocessed shots.) By aligning the polarizer right, it blocks most of the glare from entering the lens in the second shot. The shot ends up looking much more evenly-lit, without the absurdly “contrasty” effect of the first one. As a bonus, the colors “pop” a lot more. Granted, it’s still an underexposed shot of a rosebush without any flowers; it’s hardly a good shot either way. But the second one is enormously better.
I tend to hate using the flash on the camera. 95% of the time when it’s used, it ends up dominating the shot, setting the color temperature its own way, creating awful shadows everywhere, giving everyone red eye, and overexposing things nearby while underexposing the background. One thing I love about my 50mm f/1.8 lens is that I can generally use it in indoors instead of flash. (And when I do use flash, it’s typically bounced off the ceiling.)
But it turns out that the flash is actually good for something: “fill flash” is using the flash to “fill in” the shadows of a shot. Taking a picture of someone under a tree? It’s a great shot, but it’s a little dark. The key is that you dial your flash way down, so when it fires, it’ll spill a little more light on the subject, but is hardly as overpowering as it would normally be. This is something I don’t use often, so I wanted to practice a bit more.

This birdhouse is hanging on a tree, leaving it somewhat in the shade. And as you can see, it’s got sun spilling through on the ‘back’ (rightmost) part of it, which makes the rest of the shot appear even darker. (I couldn’t help but clean both of these shots up a bit in Photoshop, so this one ended up looking semi-decent. Straight out of the camera, it was way too dark on the side facing us.)
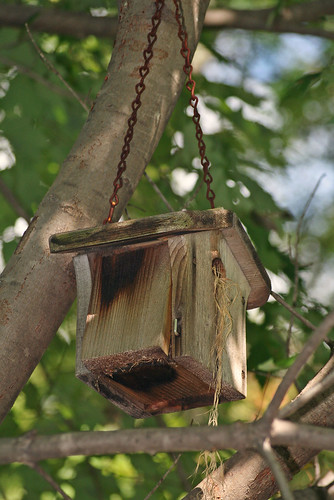
Here it is again, but with fill flash used. This honestly isn’t a great example, because it ended up being too strong. I can tell that flash was used, which takes away from it a bit. I should have dialed the flash down even more. Here it’s bright enough to overtake the nice natural light. In an ideal world, the use of fill flash would fall somewhere in between this shot and the “original” above it.
Fill flash has a lot of challenges, though. (One of them is the one I mentioned above: getting the level just right!) Another is that, if you’re not really, really careful, you end up with the same problem as using normal flash: you get awful shadows.
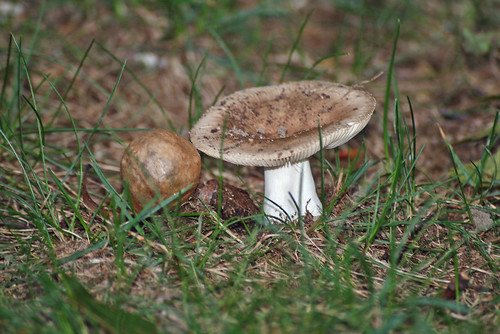
This shot was somewhat of an experiment, because it was in a shaded area, and it would have taken something like ISO800 to get a halfway decent exposure, but the lighting would still have been really plain. I used ISO400 and dialed down the flash’s strength. (On the XTi, it’s in the menus as “Flash exp. comp.,” for “Flash exposure compensation, and it regulates the on-board flash.)
Besides the fact that a photograph of a mushroom with a… what is that thing?… wouldn’t be a great shot anyway, it’s very obvious that a flash was used on this one. For one, it bounces off of the shiny thing right back into the lens. It overexposed the stem of the mushroom a bit. But most frustrating for me, it left a harsh shadow underneath the top of the mushroom. It comes across as very amateurish.
Another thing about flash is that most cameras have a flash sync of 1/200 second, which means that you can’t use a faster exposure. One place I played with using fill flash was in intense sunlight, to try to minimize the stark contrast between light and dark.

That, for example. (Another shot that really didn’t come out as well as it could have: it looks a little “overprocessed” to me, even though I didn’t do much!) I had the flash fire as low as it could go there, just to try to minimize any shadows on the rose, since the sun was coming in from the side and was quite strong. (Plus, by throwing more light on the foreground, the background is darker by comparison: note that everything that isn’t the rosebush is essentially black.)
Yet another thing is that ISO matters a lot. Normally, I try to keep ISO as low as I can, but it doesn’t make a big difference, except for noise. If I get a 1/30 second exposure at ISO100, I might bump up to ISO400 to make sure it’s got a better shutter speed. (Since a 1/30 second exposure will probably come out blurred.) Especially when you can’t set your shutter speed any faster than 1/200 of a second with flash, you want to play with ISO.
But remember that ISO is basically how sensitive to light the sensor is. While the flash is of a constant strength in terms of actual light output, raising ISO effectively raises the strength of the flash, by making the sensor more sensitive to the increased light. Thus it’s important to try to get ISO right from the start, since changing it will most likely leave you having to play with flash strength again.
The third thing? 99% of the time, I let the camera autofocus. It’s faster and more precise. But every now and then, autofocus just doesn’t want to work. Consider this shot:
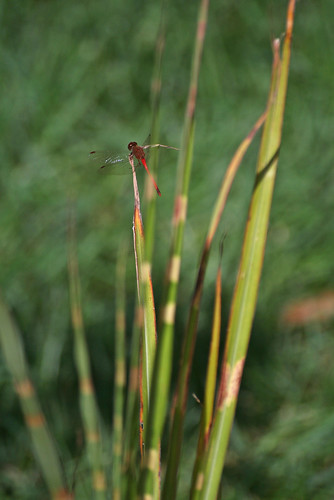
I wanted the camera to focus on the dragonfly on the big blade of grass closest to the camera… No, not the ones behind it. No no, not the lawn way in the back. You can manually set with autofocus sensor the camera uses (and, indeed, this is often helpful in tricky situations), but sometimes that’s not enough. What I’ve been working on doing is trying to get good at smoothly transitioning to autofocus mode. In the case of that dragonfly, it was jumping around a lot, so I didn’t have the time to manually select an autofocus point. The location of the auto/manual-focus switch seems pretty standardized on lenses, at least on the three I use: it happens to be right where my left hand’s thumb rests. (And right in front of the lens release, too, but I’m yet to make that mistake!) So I can flick the switch and rotate the lens until the image is nice and sharp. (You’ll want to make sure the diopter is set just right, since you’re going to be focusing based on what “looks good.” The easiest way is to use autofocus, and focus on something stationary and well-lit, with lots of contrast. And then, while looking through the viewfinder, play with the inconveniently-small knob next to the viewfinder until what you’re looking at appears perfectly sharp through the viewfinder.) It didn’t take me long at all until I could get the image most of the way there, but the hard part is getting it precise. There’s a region where it’s obviously out of focus, a “sweet spot,” and then it’s out of focus again. (Front- and back-focused.) But withing that sweet spot, there doesn’t seem to be a big difference. This is why you want your diopter perfect, and this is why you want to practice. Indeed, I’ve still got to practice more to get tack sharp, but I can at least reliably get pretty close. But I’m going not only for accuracy, but also for speed: if it takes me a while to get manual focus just right, I might as well wrestle with getting autofocus to work.
Sorry for what turned out to be an unexpectedly long post. But hopefully, it’ll be an inspiration: practicing various techniques is not only instrumental to becoming a better photographer, but it’s a lot of fun!
(Oh, and I’m 17 shots away from hitting my 9,000th frame on this camera… That works out to around 1,000 shots a month.)